Sqlite integration in cocos2d-x with wp8 in visual studio2012. | Techbirds
Posted on: September 4, 2014 /
Categories: cocos2d-x / Author Name: Kapil Deo Mishra
Hello Friends,
There are some steps for integration of sqlite in cocos2d-x with wp8 in visual studio 2012 given bellow:
Step 1.
First create a default HelloWorld project and in your HelloWorldScene.cpp ,
delete the lines in init function after these lines upto return true statement.
if(!CCLayer::init()) { return false;
}
Don’t delete return true.
Now your init function should look like
bool HelloWorld::init() { if ( !CCLayer::init() ) { return false;
}
return true;

}
Step 2.
Now we need to add a library in our project.
In order to this click on tools->extensions and updates->online->visual studio gallery
then write sqlite for windows phone in text box and then click on search.After few second sqlite for windows phone software library would appear, install it and restart the visual studio.
Now right click on HelloCpp project and then click on
properties->configuration properties->linker->input->additional dependencies->edit and then write two paths given bellow:
C:\Program Files (x86)\Microsoft SDKs\Windows
Phone\v8.0\ExtensionSDKs\SQLite.WP80\3.8.6\DesignTime\Retail\x86\sqlite3.lib
C:\Program Files (x86)\Microsoft SDKs\Windows Phone\v8.0\ExtensionSDKs\SQLite.WP80\3.8.6\DesignTime\Retail\ARM\sqlite3.lib
Above two given paths are path of sqlite software library for x86 and arm respectively.
Don’t delete anything from external dependencies.
Click on OK->Apply->OK.
Step 3.
Now, Download a project from the link:
https://www.dropbox.com/s/cosdczbcv8at5zl/sqlite-net-wp8-master.zip?dl=0
And extract it.
In solution explorer window right click on Solution ‘HelloCpp’ (12 projects) and then click on
add->existing project->sqlite-net-wp8-master->Sqlite.vcxproj->open.
And then Sqlite project would be added in solution ‘HelloCpp’(12 projects) .
Now add reference of Sqlite project in HelloCpp project. In order to this right click on HelloCpp and then click on
properties->Add New References and then select the chcekbox of sqlite.
and then click on OK.Now reference of Sqlite is added in HelloCpp project.
Step 4.
Now we have to create a database which will be our .sqlite file. So in order to do this just after the following lines
bool HelloWorld::init() { if ( !CCLayer::init() ) { return false;
}
Write the following code
sqlite3 *pDB = NULL; //for database path char* errMsg = NULL; //for error message string sqlstr; //for sql query string int result;
string dbPath = CCFileUtils::sharedFileUtils()->getWritablePath();
dbPath.append("kapil.sqlite"); result = sqlite3_open(dbPath.c_str(),&pDB); if (result != SQLITE_OK) CCLOG("OPENING WRONG, %d, MSG:%s",result,errMsg); CCLOG("result %d",result);
sqlite3_close(pDB);//for closing connection
If the value of result is 0 then you have successfully created the database otherwise it will throw and exception with OPENING WRONG MSG. Here I am naming my database as kapil.sqlite
When you run the code the value of result will print as 0 if everything is correct other wise it will throw OPENING WRONG EXCEPTION
Now to see your database where it is actually made, just follow this path
C:\Data\Users\DefApps\AppData\{2AC777CA-2D3B-41C8-98AC-B6ED1A4B0988}\Local\test.sqlite
Above path is in your phone so use isostorespy tool for see the database. In isostorespy tool click on press to explore.
And then select your device.Now your database would be display in the window.Then you can download the database from the device in your system for see the content in the database.
well, you have successfully created the database. Now its time to create table in the database.
Step 5
In order to create the table, add these lines just above the line sqlite3_close(pDB);
//creation of table result = sqlite3_exec(pDB, "create table game(stage_name varchar(32), stage_no INT)",NULL,NULL,&errMsg); if(result != SQLITE_OK)
CCLOG("CREATE TABLE FAIL %d, Msg: %s",result,errMsg);
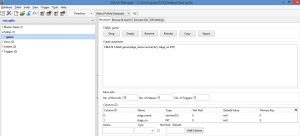
I am giving my table name as game and creating two columns. First is the name of the stage and second is the stage number
Now run the code. If you get the error create table fail then something might be wrong. Otherwise if everything is OK then your table is created
Now in order to see the table, you can view it in mozilla firefox by integrating the tool sqlite manager.
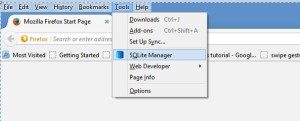
Click on tools menu after opening mozilla and look for sqlite manager. If you dont have it then you can download it by clicking get more tools. If you have successfully integrated with SQlite manager then you will see the tool menu with the sqlite manager icon
Now click on the SQLite Manager and then click on connect database icon.

Now browse the database path where you have downloaded database.
Open the .sqlite file. SQLite manager will show the file with a created table with name game on the left.
Step 6
Now we should add some content in this table. As we have already created the table so you can commnent all the creation part of the table otherwise if you dont comment then also it will not lead to any problem except a message that table already exists
So after the creation part add the following lines to populate data in the table
// for insertion
for(int i=1;igetCString(); CCString *stage_num=CCString::createWithFormat(“%d”,i); std::string s_num=stage_num->getCString(); sqlstr=”insert into game values(‘”+stage+”‘,'”+s_num+”‘)”; result=sqlite3_exec(pDB,sqlstr.c_str(),NULL,NULL,NULL); if(result!=SQLITE_OK) CCLog(“insert data failed!”); }
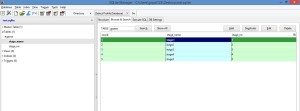
Run the program and if everything goes fine the table game will be populated with 5 rows. In order to view the data you can go to SQLite Manager, click on table game and click on browse and search and you will find the data as shown in the snapshot
Step 7 Now if you want to extract the data in your game you can use the following code but comment the insertion part now so that the data is only retrieved and not inserted
//for display sqlstr="select * from game"; CCString *number; CCString *name; sqlite3_stmt *ppStmt1;
result=sqlite3_prepare_v2(pDB,sqlstr.c_str() , -1, &ppStmt1, NULL);
for (;;) {
result = sqlite3_step(ppStmt1);
if (result == SQLITE_DONE) break; if (result != SQLITE_ROW) { printf(“error: %s!\n”, sqlite3_errmsg(pDB)); break; } name=CCString::create((const char*)sqlite3_column_text(ppStmt1, 0));
number=CCString::create((const char*)sqlite3_column_text(ppStmt1, 1));
}
So, this tutorial covers creation of database, creation of table, insertion of contents in the table and then displaying the contents of the table. Hope you liked it. This comes to the end of the tutorial.
2,370 total views, 1 views today
Share this On


